我们在之前的 position 章节当中介绍的固定定位部分,曾经提起过 z-index 这个属性,但是在之前我们只是简单的提及了一下,并没有深入的去了解它,所以在今天就抽点时间来深入的了解一下 CSS 当中的 z-index
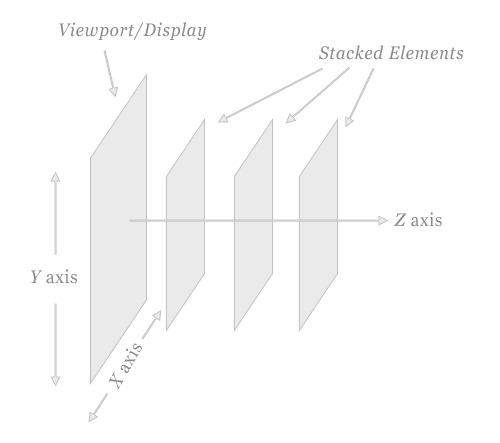
层叠上下文 层叠上下文(Stacking Context),是 HTML 元素的三维概念,这些 HTML 元素在一条假想的相对于面向(电脑屏幕的)视窗或者网页的用户的 z 轴上延伸,HTML 元素依据其自身属性按照优先级顺序占用层叠上下文的空间
所有的盒模型元素都处于三维坐标系中,除了我们常用的横坐标和纵坐标,盒模型元素还可以沿着 z 轴层叠摆放,当他们相互覆盖时,z 轴顺序就变得十分重要,但 z 轴顺序,不完全由 z-index 决定,在层叠比较复杂的 HTML 元素上使用 z-index 时,结果可能让人觉得困惑,甚至不可思议,这是由复杂的元素排布规则导致的,我们来看下面这个图
在层叠上下文中,其子元素的 z-index 值只在父级层叠上下文中有意义,子级层叠上下文被自动视为父级层叠上下文的一个独立单元
层叠上下文可以包含在其他层叠上下文中,并且一起创建一个有层级的层叠上下文
每个层叠上下文完全独立于它的兄弟元素,当处理层叠时只考虑子元素
每个层叠上下文是自包含的,当元素的内容发生层叠后,整个该元素将会 在父层叠上下文中 按顺序进行层叠
如何形成层叠上下文? 我们这里只介绍以下这些比较常见的方式,完整的列表可以参考 MDN-层叠上下文的形成
根元素(HTML)
定位元素(relative、absolute),并且 z-index 不为 auto
opacity 小于 1 时transform 不为 none 时z-index 不为 auto 的 flex-item
这里有一个需要注意的地方,即层叠上下文的层级是 HTML 元素层级的一个层级,因为只有某些元素才会创建层叠上下文,所以可以认为没有创建自己的层叠上下文的元素将被父元素的层叠上下文所包含,来看下面这个示例
1 2 3 4 5 6 7 8 9 10 11 12 13 14 15 16 17 18 19 20 21 22 23 24 25 26 27 28 29 30 31 32 33 34 35 36 37 <div id ="div1" > <h1 > Division Element #1</h1 > <code > position: relative;<br /> z-index: 5; </div > <div id ="div2" > <h1 > Division Element #2</h1 > <code > position: relative;<br /> z-index: 2; </div > <div id ="div3" > <div id ="div4" > <h1 > Division Element #4</h1 > <code > position: relative;<br /> z-index: 6; </div > <h1 > Division Element #3</h1 > <code > position: absolute;<br /> z-index: 4; <div id ="div5" > <h1 > Division Element #5</h1 > <code > position: relative;<br /> z-index: 1; </div > <div id ="div6" > <h1 > Division Element #6</h1 > <code > position: absolute;<br /> z-index: 3; </div > </div >
1
2
3
4
5
6
7
8
9
10
11
html { padding : 20px ; font : 12px /20px Arial, sans-serif; }div { opacity : 0.7 ; position : relative; }h1 { font : inherit; font-weight : bold; }#div1 , #div2 { border : 1px dashed #696 ; padding : 10px ; background-color : #cfc ; }#div1 { z-index : 5 ; margin-bottom : 190px ; }#div2 { z-index : 2 ; }#div3 { z-index : 4 ; opacity : 1 ; position : absolute; top : 40px ; left : 180px ; width : 330px ; border : 1px dashed #900 ; background-color : #fdd ; padding : 40px 20px 20px ; }#div4 , #div5 { border : 1px dashed #996 ; background-color : #ffc ; }#div4 { z-index : 6 ; margin-bottom : 15px ; padding : 25px 10px 5px ; }#div5 { z-index : 1 ; margin-top : 15px ; padding : 5px 10px ; }#div6 { z-index : 3 ; position : absolute; top : 20px ; left : 180px ; width : 150px ; height : 125px ; border : 1px dashed #009 ; padding-top : 125px ; background-color : #ddf ; text-align : center; }
如下图所示
层叠上下文如何影响层叠 主要分为以下几种情况
元素的 background 和 borders
拥有负层叠层级(negative-stack-levels)的子层叠上下文(child-stacking-contexts)
在文档流中的(in-flow),非行内级的(non-inline-level),非定位(non-positioned)的后代元素
非定位的浮动元素
在文档流中的(in-flow),行内级的(inline-level),非定位(non-positioned)的后代元素,包括行内块级元素(inline-blocks)和行内表格元素(inline-tables)
层叠层级为 0 的子层叠上下文(child-stacking-contexts)和层叠层级为 0 的定位的后代元素
层叠层级为正的子层叠上下文
上述关于层次的绘制规则递归地适用于任何层叠上下文,看下面这个示例
1 2 3 4 5 6 7 8 9 10 11 12 13 14 15 16 17 18 19 20 21 22 23 24 25 26 27 28 29 30 31 32 33 34 35 36 37 38 39 <div class ="lev1" > <span class ="bold" > LEVEL #1</span > <div id ="container1" > <div class ="lev2" > <br /> <span class ="bold" > LEVEL #2</span > <br /> z-index: 1; <div id ="container2" > <div class ="lev3" > <span class ="bold" > LEVEL #3</span > </div > <div class ="lev3" > <span class ="bold" > LEVEL #3</span > </div > <div class ="lev3" > <span class ="bold" > LEVEL #3</span > </div > <div class ="lev3" > <span class ="bold" > LEVEL #3</span > </div > <div class ="lev3" > <span class ="bold" > LEVEL #3</span > </div > <div class ="lev3" > <span class ="bold" > LEVEL #3</span > </div > <div class ="lev3" > <span class ="bold" > LEVEL #3</span > </div > <div class ="lev3" > <span class ="bold" > LEVEL #3</span > </div > <div class ="lev3" > <span class ="bold" > LEVEL #3</span > </div > <div class ="lev3" > <span class ="bold" > LEVEL #3</span > </div > <div class ="lev3" > <span class ="bold" > LEVEL #3</span > </div > </div > </div > <div class ="lev2" > <br /> <span class ="bold" > LEVEL #2</span > <br /> z-index: 1; </div > </div > </div > <div class ="lev1" > <span class ="bold" > LEVEL #1</span > </div > <div class ="lev1" > <span class ="bold" > LEVEL #1</span > </div > <div class ="lev1" > <span class ="bold" > LEVEL #1</span > </div >
1
2
3
4
5
6
7
div { font : 12px Arial; }span .bold { font-weight : bold; }div .lev1 { width : 250px ; height : 70px ; position : relative; border : 2px outset #669966 ; background-color : #ccffcc ; padding-left : 5px ; }#container1 { z-index : 1 ; position : absolute; top : 30px ; left : 75px ; }div .lev2 { opacity : 0.9 ; width : 200px ; height : 60px ; position : relative; border : 2px outset #990000 ; background-color : #ffdddd ; padding-left : 5px ; }#container2 { z-index : 1 ; position : absolute; top : 20px ; left : 110px ; }div .lev3 { z-index : 10 ; width : 100px ; position : relative; border : 2px outset #000099 ; background-color : #ddddff ; padding-left : 5px ; }
页面展示如下
下面我们就来分几情况讨论元素是如何影响层叠的
不含 z-index 元素如何层叠 当没有元素包含 z-index 属性时,元素按照如下顺序层叠(从底到顶顺序)
根元素(<html>)的背景和边界
位于普通流中的后代无定位块级元素,按它们在 HTML 中的出现顺序层叠
后代中的定位元素,按它们在 HTML 中的出现顺序层叠
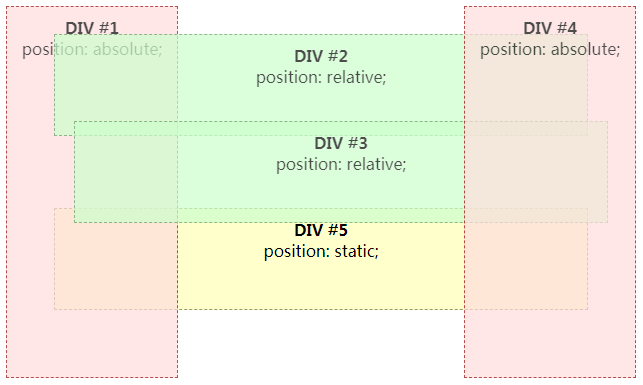
这里需要注意一点,即普通流中的无定位块级元素『始终先于』定位元素渲染,并出现在定位元素下层,即便它们在 HTML 结构中出现的位置晚于定位元素也是如此,我们来看下面这个例子
1 2 3 4 5 6 7 8 9 10 11 12 13 14 15 <div id ="abs1" class ="absolute" > <b > DIV #1</b > <br /> position: absolute; </div > <div id ="rel1" class ="relative" > <b > DIV #2</b > <br /> position: relative; </div > <div id ="rel2" class ="relative" > <b > DIV #3</b > <br /> position: relative; </div > <div id ="abs2" class ="absolute" > <b > DIV #4</b > <br /> position: absolute; </div > <div id ="sta1" class ="static" > <b > DIV #5</b > <br /> position: static; </div >
1
2
3
4
5
6
7
8
9
10
b { font-family : sans-serif;}div { padding : 10px ; border : 1px dashed; text-align : center;}.static { position : static; height : 80px ; background-color : #ffc ; border-color : #996 ;}.absolute { position : absolute; width : 150px ; height : 350px ; background-color : #fdd ; border-color : #900 ; opacity : 0.7 ;}.relative { position : relative; height : 80px ; background-color : #cfc ; border-color : #696 ; opacity : 0.7 ;}#abs1 { top : 10px ; left : 10px ;}#rel1 { top : 30px ; margin : 0px 50px 0px 50px ;}#rel2 { top : 15px ; left : 20px ; margin : 0px 50px 0px 50px ;}#abs2 { top : 10px ; right : 10px ;}#sta1 { background-color : #ffc ; margin : 0px 50px 0px 50px ;}
以上代码运行完成以后是下面这样的
这里有一个需要注意的地方,就是上图当中的 div#5,由于其是非定位块级元素,虽然它在 DOM 顺序上处于最后,但它的渲染始终位于定位元素下面
浮动的块元素如何层叠 对于浮动的块元素来说,层叠顺序变得有些不同,浮动块元素被放置于非定位块元素与定位块元素之间,它遵循以下的规律
根元素(<html>)的背景和边界
位于普通流中的后代无定位块级元素,按它们在 HTML 中的出现顺序层叠
浮动块元素
位于普通流中的后代无定位行内元素
后代中的定位元素,按它们在 HTML 中的出现顺序层叠
同样的,我们也来看一个示例,如下
1 2 3 4 5 6 7 8 9 10 11 12 13 14 15 16 17 18 <div id ="abs1" > <b > DIV #1</b > <br /> position: absolute; </div > <div id ="flo1" > <b > DIV #2</b > <br /> float: left; </div > <div id ="flo2" > <b > DIV #3</b > <br /> float: right; </div > <br /> <div id ="sta1" > <b > DIV #4</b > <br /> no positioning </div > <div id ="abs2" > <b > DIV #5</b > <br /> position: absolute; </div >
1
2
3
4
5
6
7
div { padding : 10px ; text-align : center; }b { font-family : sans-serif; }#abs1 { position : absolute; width : 150px ; height : 200px ; top : 20px ; right : 160px ; border : 1px dashed #900 ; background-color : #fdd ; }#sta1 { height : 100px ; border : 1px dashed #996 ; background-color : #ffc ; margin : 0px 10px 0px 10px ; text-align : left; }#flo1 { margin : 0px 10px 0px 20px ; float : left; width : 150px ; height : 200px ; border : 1px dashed #090 ; background-color : #cfc ; }#flo2 { margin : 0px 20px 0px 10px ; float : right; width : 150px ; height : 200px ; border : 1px dashed #090 ; background-color : #cfc ; }#abs2 { position : absolute; width : 300px ; height : 100px ; top : 150px ; left : 100px ; border : 1px dashed #990 ; background-color : #fdd ; }
以上代码运行完成以后是下面这样的
注意与上面不含 z-index 元素对比查看,下面我们就来看看我们今天的主角,z-index 如何影响层叠
z-index 如何影响层叠 z-index 属性指定了一个具有定位属性的元素及其子代元素的 z-order,当元素之间重叠的时候 z-order 决定哪一个元素覆盖在其余元素的上方显示,通常来说 z-index 较大的元素会覆盖较小的一个
对于一个已经定位的元素(即 position 属性值不是 static 的元素),z-index 属性指定
元素在当前层叠上下文中的层叠层级
元素是否创建一个新的本地层叠上下文
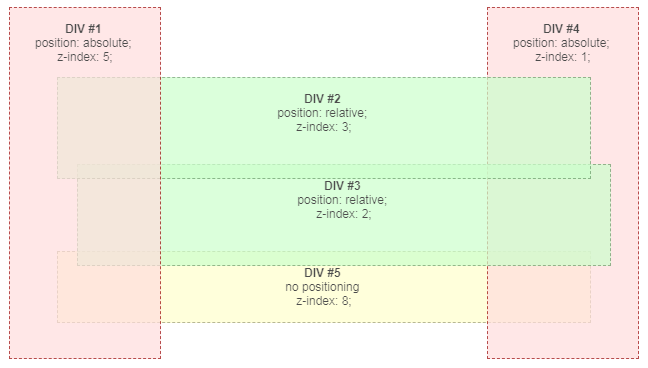
同样的,看下面这个示例
1 2 3 4 5 6 7 8 9 10 11 12 13 14 15 16 17 18 19 20 21 22 23 24 25 <div id ="absdiv1" > <br /> <span class ="bold" > DIV #1</span > <br /> position: absolute; <br /> z-index: 5; </div > <div id ="reldiv1" > <br /> <span class ="bold" > DIV #2</span > <br /> position: relative; <br /> z-index: 3; </div > <div id ="reldiv2" > <br /> <span class ="bold" > DIV #3</span > <br /> position: relative; <br /> z-index: 2; </div > <div id ="absdiv2" > <br /> <span class ="bold" > DIV #4</span > <br /> position: absolute; <br /> z-index: 1; </div > <div id ="normdiv" > <br /> <span class ="bold" > DIV #5</span > <br /> no positioning <br /> z-index: 8; </div >
1
2
3
4
5
6
7
div { opacity : 0.7 ; font : 12px Arial; }span .bold { font-weight : bold; }#normdiv { z-index : 8 ; height : 70px ; border : 1px dashed #999966 ; background-color : #ffffcc ; margin : 0px 50px 0px 50px ; text-align : center; }#reldiv1 { z-index : 3 ; height : 100px ; position : relative; top : 30px ; border : 1px dashed #669966 ; background-color : #ccffcc ; margin : 0px 50px 0px 50px ; text-align : center; }#reldiv2 { z-index : 2 ; height : 100px ; position : relative; top : 15px ; left : 20px ; border : 1px dashed #669966 ; background-color : #ccffcc ; margin : 0px 50px 0px 50px ; text-align : center; }#absdiv1 { z-index : 5 ; position : absolute; width : 150px ; height : 350px ; top : 10px ; left : 10px ; border : 1px dashed #990000 ; background-color : #ffdddd ; text-align : center; }#absdiv2 { z-index : 1 ; position : absolute; width : 150px ; height : 350px ; top : 10px ; right : 10px ; border : 1px dashed #990000 ; background-color : #ffdddd ; text-align : center; }
运行完以后是下面这样的
这里需要注意上面的 div#5,由于其不是定位元素,所以 z-index 是不生效的
于非浮层元素,避免设置 z-index 值,原因是定位元素一旦设置了 z-index 值,就从普通定位元素变成了层叠上下文元素,相互间的层叠顺序就发生了根本的变化,很容易出现设置了巨大的 z-index 值也无法覆盖其他元素的问题
实战 看完了上面关于层叠上下文的一些介绍以后,我们来一个关于层叠相关的面试题,加深一下印象,它要求写出以下六个 div 元素的堆叠顺序,要求最上面的元素排在第一个位置,代码如下
1 2 3 4 5 6 7 8 <div class ="one" > <div class ="two" > </div > <div class ="three" > </div > </div > <div class ="four" > <div class ="five" > </div > <div class ="six" > </div > </div >
1
2
3
4
5
6
7
8
9
10
11
12
13
14
15
16
17
18
19
20
21
22
.one { position : relative; z-index : 2 ; .two { z-index : 6 ; } .three { position : absolute; z-index : 5 ; } } .four { position : absolute; z-index : 1 ; .five {} .six { position : absolute; top : 0 ; left : 0 ; z-index : -1 ; } }
最后的答案为 .three .two .one .five .six .four,可以将各元素添加一个背景色用于测试
参考